
FB page - April's Anticlastic Curly Earrings Private FB Group
Questions?
IF YOU HAVE ANY QUESTIONS THROUGHOUT THE CLASS OR AFTERWARDS, OUR PRIVATE FACEBOOK PAGE IS A GREAT RESOURCE. THERE ARE MANY TALENTED METALSMITHS IN THE GROUP, AND YOU CAN QUICKLY LEARN FROM EACH OTHER AND HELP EACH OTHER OUT. APRIL WILL CHECK IN DAILY DURING CLASS AND PERIODICALLY AFTERWARDS TO OFFER HER SOLUTIONS AND SUGGESTIONS TOO. WE’LL DURING THE CLASS, WE WILL CURATE THE FEED AND KEEP A LIST OF TOPICS/QUESTIONS FOR APRIL TO ADDRESS AT EACH OF THE NEXT SESSIONS.Welcome to
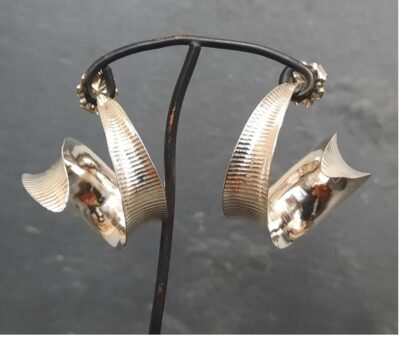
Anticlastic Curly Earrings
You’re in for a real treat
*** Daily schedules are based on Phoenix, Arizona time ***
Class Schedule
Saturday, March 4th
Saturday, March 11th
Saturday, March 18th
9:00 – 10:30 am (Phoenix time)
Students will participate in Zoom classes with April on three Saturdays in the month of March. Question and answer period, and further instruction will occur during these classroom meetups.
The text, images, and design in this online class are the sole property of April Bower Jewelry.
Do not copy, reproduce, or represent any content without the expressed written permission of the author.
Click here on day of event to access Zoom classroom. REMEMBER: Daily schedules are based on Phoenix, Arizona time
MORE INFO
April Bower
April Bower has always been fascinated by the many varied processes involved in metalworking. While earning a Bachelor of Fine Arts degree, her
jewelry work was experimental and
creative using silver.
After teaching metalsmithing and then apprenticing in fine jewelry, she then began working exclusively in gold, diamonds and faceted stones for 18 years.
She now has come full circle, back to what she loves; teaching and the fun, creative, metal work.
*** Daily schedules are based on Phoenix, Arizona time ***
important videos:
Please watch these videos prior to class - especially the Studio Safety video.
Click each link:
important links on Vivi Magoo website
Your Step-by-Step Instructions [PDF]
Anticlastic Curly Earrings
CHAT NOTES
_____________________
April’s Curly Anticlastic Earrings
March 4th
Welcome to our first meetup session!
Vise
Don’t hammer over your head – it’s really hard on your joints. If your vise is positioned too high, either stand on something to raise you up, or lower your vise so you’re positioned properly.
For proper placement, you want to aim for your forearm to be at a right angle to the stake when striking the metal with hammer in hand
You want your stake to be as firmly held in the jaws of the vise as possible. Use a hammer (not your good one!) to tighten the arm that controls the jaws.
Attach your vise to a piece of wood with screws and bolts. It makes it a portable tool that you can move around as needed (attach to table with clamps to hold it in place)
Stump
If your stump develops cracks, they may become useful in your designs from time to time!
Place your stump on wheels so you can move it around your studio
Be creative when thinking about what to use for hammering. Wood beams cut to a shorter size, can be useful in your studio!
To level the top of the vise, you may need to use shims at the base
Attach an old leather belt around the perimeter of the stump to hold your tools (hammers, etc.)
You can carve out a deep hole in the side of your stump to hold a ring mandrel for hammering and shaping
Search for FB groups that focus on stump-making
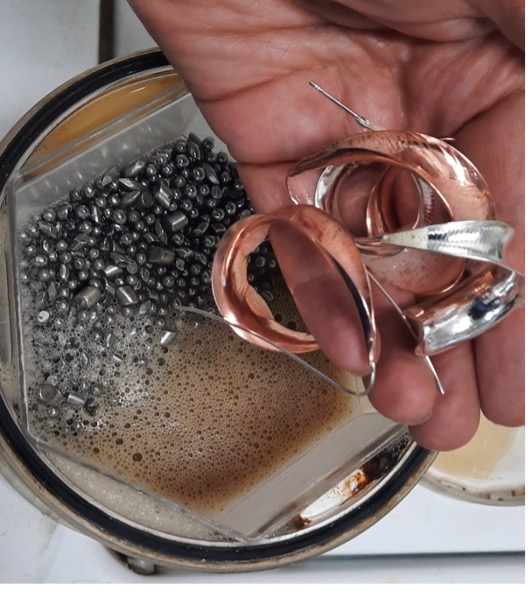
To remove pink from brass or bronze
Super Pickle
2/3 parts vinegar and 1/3 part hydrogen peroxide
or
Super Pickle Alternative
2/3 parts vinegar and 1/3 part hydrogen peroxide – can add hydrogen peroxide to recharge the solution (doesn’t need to be heated)
Texturing Plates
https://www.etsy.com/market/jewelry_texture_plates
can use leaves, grosgrain ribbon, screening or a hammer texture - anything that is a small and tight pattern for these smaller earrings
The texture hides a multitude of sins!
Metals to use
Red brass, yellow brass (hardware store purchase), copper, silver, Argentium
Layout Patterns
Start with larger patterns and work towards smaller ones when you become more experienced.
If there is a pattern you like and will use again, stamp the info into the metal for future reference.
April can email a pdf of the patterns if you’d like, but she suggests drawing your own in these general sizes
100 mm long x 44 mm wide –
90 mm x 12 mm
85 mm x 12 mm
65 mm x 8 mm (smallest)
draw a long arc – folded in half to make it symmetrical (if you want them symmetrical!)
Pliers – used to finish earwires
Half round bending pliers
Round nose pliers
Earwires – gauges
April uses 19-gauge or 20-gauge wire for her earwires.
HOMEWORK FOR NEXT WEEK
Work on projects
Post photos of work-in-progress on FB page
Ask questions on FB page – if you are wondering about something, so are probably others! April can address the issue(s) for the whole group rather at once
_____________________
Anticlastic Curly Earrings
CHAT NOTES
_____________________
April’s Curly Anticlastic Earrings
March 11th
Welcome to our second meetup session!
Barb Solem: We will post the classroom video today after class ends. You can link to it from our private page on the Vivi Magoo Academy website.
Barb Solem: Remember to post photos of your work in progress on our private FB page!
Barb Solem: Annealing is your friend! If the metal seems to be fighting you, try annealing to make it more malleable.
Barb Solem: Tumbling will polish your pieces very nicely; however, it doesn’t work harden the metal too well….
Barb Solem: Use a mandrel to shape your earwires. Mark the curved bend overly tight at first to compensate for the springiness of the wire.
Sally Peregoy: Would you please review heating the argentium in the oven? Temp, time? Ok to have the finished piece in the over for copper and silver?
Barb Solem: If you want more defined texture on your metal and you are using a rolling mill, try rolling it without using a denser paper/foam. Using a thinner paper to sandwich your metal will give you a thicker and more defined impression and shouldn’t mar your rollers.
Barb Solem: When you’re forming the metal on the stake, you may need to bend the back end of the metal to the side and out of the way. You can always reposition it when you’re finished.
Barb Solem: To make a tighter curl on the end of your metal, try concentrating on the side of the stake with your hammer rather than in the center of the stake.
Barb Solem: If you have an enameling tripod, you can use that in many ways. You can use it as a camera tripod to photograph your pieces. Additionally, you can use the wire screen set up on the tripod to solder earwires, etc. This technique will free up both hands for soldering!
Barb Solem: How often do you have to pickle after annealing? Not every time, but often enough to keep your tools clean (copper will produce a lot of “gunk” that will flake off and dirty up your things).
Barb Solem: In order to make a pair of earrings that closely match each other, it’s easiest to make them at the same time - working a bit on each of them, alternating back and forth.
Barb Solem: To lessen tension on your muscles and joints when hammering, hold your hammer loosely rather than with a tight death grip!
Barb Solem: harden the Argentium in the toaster oven after you have completed all your shaping/soldering/finishing/etc. This will harden/stiffen the metal.
You’ll need to pickle after heating in the toaster oven, but it’s easy to remove the discoloration
https://www.riogrande.com/knowledge-hub/how-to/how-to-harden-argentium-silver/
Sherri Walter: I haven’t worked with Brass or Bronze before .. can it be annealed?
Barb Solem: You can anneal brass and bronze, but it will turn pink after heating. When you have completely finished your project, you can use super pickle to remove the pink discoloration. Don’t leave your metal in the pickle too long - it will begin to disintegrate your metal!
Nancy Ennis: Has anyone experimented with a different shape of template or earring?
Barb Solem: Smaller templates are possible, but they will be harder to manipulate and hold while forming.
Nancy Ennis: Thanks everyone!
Barb Solem: Remember to adjust the time for our meetup next Saturday - Daylight savings time occurs tomorrow night.
_____________________
Anticlastic Curly Earrings
CHAT NOTES
_____________________
Instructional Videos
Videos will be available to view on February 25th.
Pre-recorded videos will be available for student viewing and will remain available for an additional one month at end of class.
Anticlastic Curly Earrings YouTube video links
April Bower
1INTRODUCTION A C EARRINGS
3 FORMING GETTING STARTED, COPPER
4 CONTINUING TO REFINE, COPPER
5 CONTINUING: THE HARD PART, COPPER
6 REFINING ENDS & SOLDERING, COPPER
7 CLOSING AROUND THE POSTS, COPPER
9 BEGINNING SILVER PAIR
10 CONTINUING SILVER PAIR
11 FINISH SHAPE & SOLDER, SILVER
12 CLOSING AROUND POSTS,SILVER
13 SHAPING POST & NUT, SILVER
14 FINISHING & REVEAL, SILVER
Supplies & materials / kit for Anticlastic Curly Earrings Online Class by April Bower
TOOL KIT: $85 plus shipping
Large wood sinusoidal stake
Small wood sinusoidal stake
Nylon cross peen mallet large
Nylon cross peen mallet small
Specialty tools needed
Sinusoidal stakes (anticlastic forming) in wood or Delrin, or steel or end hooks assorted sizes
here is a commercial one “small” in Delrin from Rio which would be wonderful
here is a commercial one Extra small from Rio
Here is a wood version I offer order “large” #7…more affordable
Here is a wood version I offer order “small” #8 in photo
End hooks (need several sizes) from NC Black
Nylon or plastic cross peen mallets large & small
Sturdy Vise Like this , or better this, mounted to a stable surface (stump or table)
Shears for metal
half round file 6” something like this
Texturing tools: hammers, stamps or rolling mill or Pre-etched metal
Torch for soldering posts & annealing
EZ silver solder
Closing hammer or small ball peen like this Or better…
smaller goldsmith cross peen (optional)
Ring Mandrel
Assorted grit radial discs for flex shaft or Dremel #400 is my fav.
24 to 26g sheet metal in copper or bronze or brass
26g sterling or Argentium silver sheet
Additional Class Comments
Students able to follow and work at own pace, but ask questions / help from instructor each morning of 3 day class. Videos will be available for 1 month after.